Let’s be honest: there is nothing worse than sitting down to a dinner of “chicken cardboard.” We’ve all been there—tough, stringy, and requiring a gallon of water just to swallow.
The fear of dry chicken is the #1 reason people over-sauce their meals or avoid cooking breasts entirely. But what if I told you that perfectly juicy, tender baked chicken isn’t about luck? It’s about a few simple science-backed steps.
In this guide, I’m sharing the definitive method for how to bake chicken breast without drying it out, covering everything from the “magic” temperature to the one mistake everyone makes.
Why Does Baked Chicken Get Dry?
Before we fix it, we have to understand the “why.” Chicken breast is incredibly lean. Unlike thighs, it has almost no fat to buffer it against heat.
- Overcooking: Even 2 minutes too long can ruin the texture.
- Uneven Thickness: The thin “tail” of the breast overcooks while the thick center is still raw.
- Skipping the Rest: Cutting into the chicken immediately lets all the “liquid gold” (juice) run out onto the plate.
- The “Big Three” Rules for Juicy Chicken
- To ensure your chicken is succulent every single time, follow these three non-negotiables:
- 1. Bring it to Room Temp
- Never take chicken straight from the fridge to the oven. Let it sit on the counter for 15–20 minutes. This ensures it cooks evenly from the outside in.
- 2. The Power of Pounding
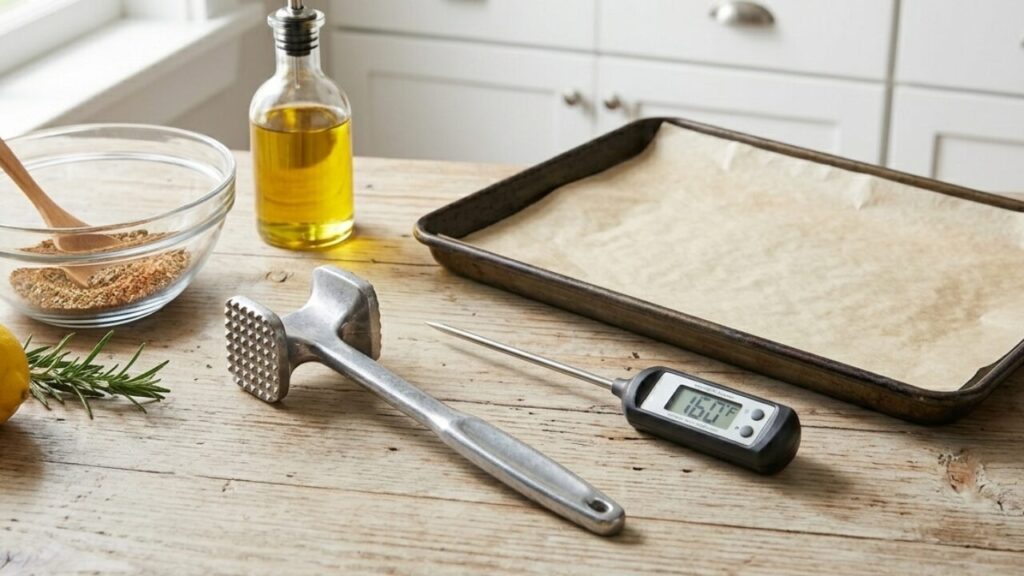
- Use a meat mallet (or a heavy skillet) to pound the thickest part of the breast until it’s an even thickness (about 3/4 inch). This is the secret to making sure the whole piece finishes cooking at the exact same moment.
- 3. High Heat is Your Friend
- Forget “low and slow.” For chicken breast, 425°F (220°C) is the magic number. High heat sears the outside and locks in moisture, cooking the chicken fast enough that the center stays tender.
How to Bake Chicken Breast Without Drying It Out
Ingredients
Method
- Prep: Preheat oven to 425°F. Pat the chicken completely dry with paper towels (moisture on the surface steams the meat instead of roasting it).
- Season: Rub generously with olive oil and your spice blend. Don’t be shy—seasoning creates a crust that holds in moisture.
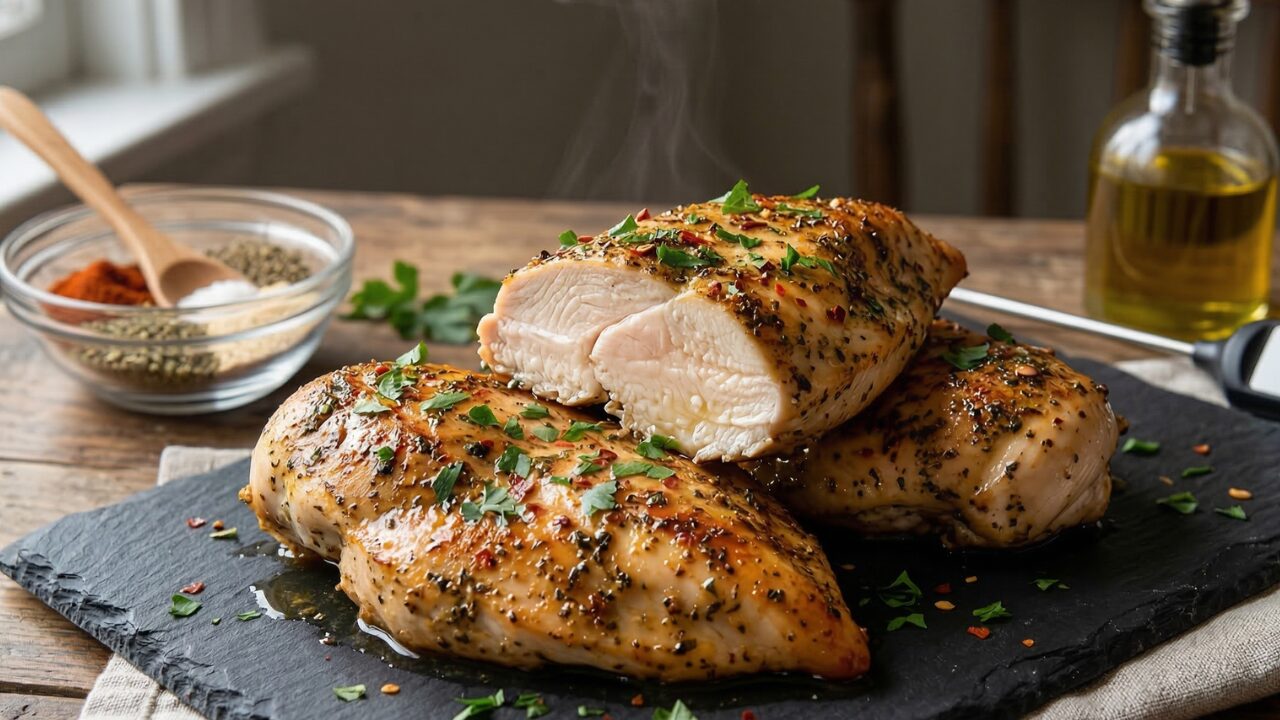
- Bake: Place in a baking dish or on a parchment-lined tray. Bake for 18–22 minutes.
- The Temperature Check: Use a digital meat thermometer. Pull the chicken out when it hits 160°F–162°F.
- Important Note: “Carryover cooking” will bring the temperature up to the FDA-recommended 165°F while it rests. If you wait until 165°F to pull it out, it will be overcooked by the time you eat it!
- The Rest: Transfer the chicken to a plate and tent it loosely with foil. Let it rest for at least 5–10 minutes. This allows the fibers to reabsorb the juices.
Notes
-
The “Carryover” Secret: Do not wait for the chicken to hit 165°F in the oven! Pull it out at 160°F. The internal temperature will continue to rise while it rests under the foil, reaching the safe 165°F mark without drying out the meat.
-
Don’t Skip the Rest: If you cut the chicken immediately, the juices will escape. Resting for 5–10 minutes allows the muscle fibers to relax and reabsorb the moisture.
- What is “Woody Breast”?: If your chicken feels unusually hard or has white striping before cooking, it might be “woody breast.” This is a texture issue from the farm. Pounding it extra thin can help, but it’s best to avoid these pieces when shopping.
- Baking from Frozen: I don’t recommend baking straight from frozen for this specific high-heat method. The outside will dry out before the center thaws. For the best results, thaw overnight in the refrigerator.
-
Storage & Meal Prep: Store leftovers in an airtight container for up to 4 days. To reheat without drying out, add a splash of water or chicken broth and cover with a damp paper towel before microwaving.
- Variation (The Foil Method): If you prefer a “steamed” and extra soft texture for shredding (like for tacos), you can wrap the breasts individually in foil and bake at 375°F for 25–30 minutes.
| Nutrient | Amount Per Serving | % Daily Value* |
| Calories | 325 kcal | – |
| Total Fat | 9g | 12% |
| Saturated Fat | 1.5g | 8% |
| Cholesterol | 145mg | 48% |
| Sodium | 450mg | 20% |
| Total Carbohydrates | 1g | 0% |
| Dietary Fiber | 0g | 0% |
| Sugars | 0g | – |
| Protein | 52g | 104% |
Frequently Asked Questions (FAQ)
Should I cover chicken with foil while baking?
Usually, no. Baking uncovered at high heat gives you a better “crust.” However, if you are baking at a lower temp (like 350°F), covering it can help prevent the top from drying out before the middle is done.
Can I bake frozen chicken breasts?
You can, but it’s the easiest way to get dry chicken. The outside will always be overcooked by the time the center thaws. For the best results, thaw in the fridge overnight.
How do I store and reheat leftovers without drying them out?
Store in an airtight container. When reheating, add a teaspoon of water or chicken broth to the plate and cover it with a damp paper towel in the microwave.
Essential Kitchen Tools for Success
- Digital Meat Thermometer: This is the only way to be 100% sure your chicken is done.
- Meat Mallet: For even thickness.
- Rimmed Baking Sheet: Allows air to circulate better than a deep casserole dish.
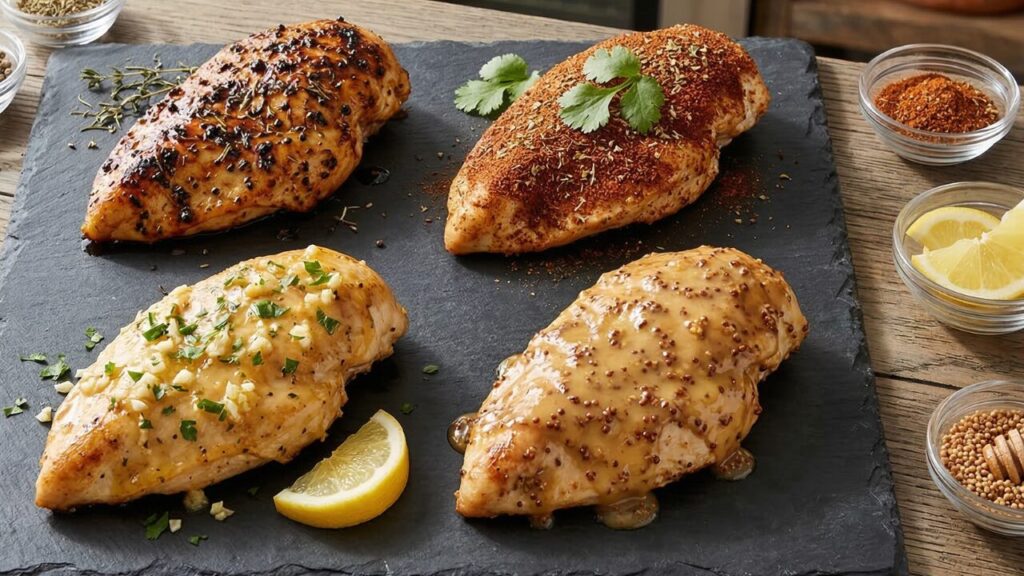
Variations To Try
- The Lemon Garlic Herb:Instead of the dry rub, whisk together 2 tablespoons of melted butter, 1 tablespoon of fresh lemon juice, 2 cloves of minced garlic, and 1 teaspoon of dried oregano. Brush this over the chicken before baking. (Keyword: Lemon Garlic Chicken Breast)
- The “Everything” Bagel Crust:Brush the chicken with a light coating of Dijon mustard or honey, then coat the top generously with “Everything Bagel” seasoning. This adds a salty, crunchy texture without the calories of breading. (Keyword: Everything Bagel Chicken)
- Spicy Mexican-Style:Swap the standard seasoning for a blend of chili powder, cumin, and a pinch of cayenne pepper. This version is perfect for slicing into salads, tacos, or burrito bowls. (Keyword: Mexican Chicken Meal Prep)
- Garlic Parmesan “Crust”:Mix 1/4 cup of grated Parmesan cheese with your dry spices. Press the cheese mixture firmly onto the oiled chicken. The cheese will caramelize in the high heat ($425^\circ\text{F}$), creating a crispy, savory exterior. (Keyword: Parmesan Crusted Chicken)
- The Honey Mustard Glaze:During the last 5 minutes of baking, brush the chicken with a mixture of equal parts honey and Dijon mustard. This creates a sticky, sweet-and-savory glaze that locks in even more moisture. (Keyword: Honey Mustard Glazed Chicken)
| If you want… | Use this Variation: | Pairs well with… |
| Crispy Texture | Garlic Parmesan | Roasted Asparagus |
| Zesty & Fresh | Lemon Garlic Herb | Rice Pilaf or Quinoa |
| Sweet & Savory | Honey Mustard | Roasted Sweet Potatoes |
| Spicy/Bold | Mexican-Style | Corn Salad or Beans |
Storing, Reheating, and Freezing
How to Store
- Refrigeration: Place the cooked chicken in a shallow, airtight container. It will stay fresh and juicy for 3–4 days.
- The “Cool Down” Rule: Do not leave your chicken on the counter for more than 2 hours. However, let it stop steaming before you seal the lid—otherwise, the trapped steam will make the exterior soggy.
The Best Ways to Reheat (Without Drying It Out!)
Reheating is where most people fail. Use these methods to keep that “just-baked” texture:
- The Microwave Hack (Fastest): Slice the chicken first. Place it on a microwave-safe plate and add 1 tablespoon of water or chicken broth to the dish. Cover tightly with a damp paper towel. Microwave at 70% power in 30-second intervals until warm.
- The Oven Method (Best Texture): Preheat your oven to 325°F. Place the chicken in a baking dish with a splash of broth and cover the dish tightly with aluminum foil. Heat for 10–15 minutes. This creates a “steam chamber” that revives the moisture.
- The Skillet Method: Add a teaspoon of oil or butter to a pan over medium heat. Add the sliced chicken and a splash of water. Cover with a lid for 2 minutes to let the steam penetrate the meat.
How to Freeze
- Flash Freeze: If you are meal prepping, slice or cube the chicken first. Lay the pieces on a baking sheet in a single layer and freeze for 1 hour. This prevents them from clumping together.
- Storage: Transfer the frozen pieces to a heavy-duty freezer bag. Squeeze out as much air as possible to prevent freezer burn.
- Timeline: For best quality, consume within 2–3 months.
- Thawing: Thaw in the refrigerator overnight before reheating.
Equipment Needed
- Meat Mallet (or Heavy Skillet): Crucial for pounding the chicken to an even thickness. This ensures the thin part doesn’t dry out while the thick part finishes.
- Digital Meat Thermometer: This is the #1 most important tool. It is the only way to guarantee you pull the chicken at exactly 160°F for peak juiciness.
- Large Rimmed Baking Sheet: Provides plenty of room for air circulation around the meat. A flat sheet is better than a deep casserole dish for “roasting” vs. “steaming.”
- Parchment Paper or Silicone Mat: Prevents the chicken from sticking to the pan and makes cleanup a breeze without tearing the seasoned skin.
- Large Mixing Bowl (Optional): Helpful for tossing the chicken in oil and spices to ensure 100% coverage.
- Aluminum Foil: Essential for tenting the chicken while it rests. This keeps the heat in while the juices redistribute.